Thursday, 19 September 2019

Transfer WhatsApp from Samsung to iPhone


1. Transfer WhatsApp from Samsung to iPhone via Email Chat

This is a solution that you can use to read your Samsung WhatsApp data on the iPhone. But we must admit that that is all it can do. You will not be able to read the chats on the WhatsApp app on the iPhone. To use this solution to transfer WhatsApp messages from your Samsung to iPhone. The following simple steps will show you how;

Step 1: Open WhatsApp on your Samsung device and then tap “Settings > Chat Settings” and then select “Email Chat” from the list of options.

Step 2: Select the WhatsApp history you would like to transfer and choose whether you want to send the message “without media” or you would like to “Attach Media” depending on what you want.Also Read:h33t proxy


Step 3: Enter the email address you want to use to send the email and then tap “Send”.

Step 4: Now log into that email on your iPhone and download the TXT attachment to read the messages.
2. Transfer WhatsApp Messages from Samsung to iPhone via Backup

Long time WhatsApp users are familiar with this solution. You can use WhastApp’s in-built backup feature to create a backup of your chats on your Samsung device and then transfer them to the iPhone. This process will work only if you use the same phone number to set up WhatsApp on both devices. Here’s how to use it;

Step 1: On the Samsung device, open WhatsApp and then go to Menu > Settings > Chat > Chat Backup to create a full backup of all the data on the Samsung device.


Step 2: Now install WhatsApp on your iPhone and then set up using the same phone number you used on the Samsung device.

Step 3: Once you’ve verified your phone number, you should see a message popup on the screen asking you to restore the backup. Simply tap “Restore” and all the chats will be restored on to the iPhone.


3. Transfer WhatsApp Messages with a Professional Tool

Also Read: rarbg proxy

Friday, 1 March 2019

Apple Recommended Solution - Set the Internet Explorer (Complicated)


Apple Recommended Solution - Set the Internet Explorer (Complicated)

When connecting to iTunes store and you may notice the iTunes error 310. Due to this, you must check if other browsers such as Mozilla and Google work perfectly. If they function properly, but the iTunes don't connect, there may be a problem with the internet explorer connection.

Also Read:5 Best Funny Face Swap Apps For iPhone in 2019

Also Read:How to Share Private Home Videos with Family and Friends?

Step 1: Launch and open the internet explorer, and you may receive a message "Proxy Server is not responding." When this occurs, click on the "Tools" in the browser toolbar and select "Internet options."Also Read:Excel Recovery – Recover Deleted XLS/XLSX Files
Also Read:HEVC Converter: Convert HEVC/H.265 Files on Windows/Mac
Also Read:How to Bypass Android Lock Screen with 3 Methods?

Step 2: When the "Internet Options" window is displayed, click on the connections tab at the top and select the Local Area Network settings.

Step 3: Click "OK" to close the Local Area Network settings window. Close the "Internet Options" window.

Step 4: Re-open the internet explorer, it should be working perfectly.


3. Other Fix Tips
Switch off Parental Control

This method usually works perfectly for iTunes users experiencing error 310.

Step 1: Open iTunes in the dialog box

Step 2: In the dialog box, click on the parental tab

Step 3: Disable access to the iTunes store by inspecting the box tagged as iTunes store

Step 4: Select the grey color that allows access to iTunes automatically.

Step 5: Select OK, exit and open the iTunes again.


2. Perform a Full Malware Scan on Your Computer

There is a probability that the 310 error could be linked to a malware infection on your computer. This malicious infection can corrupt, and damage runtime errors-related files. Also, there is a chance that the 310 error you are experiencing is associated with a component of the malicious program.


3. Clean out Your System Junk (Temporary Folders and Files) with Disk Cleanup

Over time, your PC accumulates junk files from computer use and web surfing. If this junk is not cleaned out occasionally, it can lead to slow respond of iTunes or cause 310 errors due to overloaded hard drive or file conflicts. However, cleaning these temporary files with Disk Cleanup may not only resolve the 310 error, but it can speed up the performance of your computer.

How to Run Disk Cleanup on PC:

Step 1: Click on the start button

Step 2: Search for the word “command,” don’t click on the “ENTER” button yet

Step 3: Hold the Ctrl-Shift button on your keyboard and press “ENTER.”


Step 4: An authorization dialog box will be displayed, click “Yes.”

Step 5: A black box with a blinking cursor will display. Type “cleanmgr” and press “OK.”

Step 6: The disk cleanup will start to analyze the occupied disk space you can recover.

Step 7: Check the boxes of the categories you want to clean and press OK.
You may also like:

Wednesday, 13 February 2019

How to Transfer Photos from iPhone to PC 2019


1. Import Photos from iPhone to PC via Windows Photo Gallery

You can easily transfer photos to your PC by connecting your iPhone via Windows built-in function: Windows Photo Gallery. This is totally free of charge and without downloading other applications. Follow the steps.

Step 1. Connect your iPhone to the PC with a USB cable.

Step 2. Select the Start button, which is the Windows icon in the bottom left corner, and then Open the Photos app.

Step 3. Select Import, and follow its instructions. It'll automatically select new items which haven't been imported before. Of course you can choose what to import, also.


Note: This works for Windows 10. If you want to Import photos to Windows 8, refer to the Microsoft's instructions. If you use Windows 7, then import pictures to Windows 7 following here.
2. Transfer iPhone Photos to PC by Emailing Them to Yourself

Another way I use often is to email all the pictures to myself. Maybe you think that this is just too simple to take as a solution, but think about it - you can download all the pictures on all your computers, even other mobile devices.

Step 1. Just select all the photos you want to transfer on your iPhone, and then tap on the Upload icon to choose Copy.

Step 2. Open Mail app to edit an email and paste all the photos. Then send the email to yourself.

Step 3. Now you can login your email on your PC and download all the photos.

You can also double-tap the blank in the email body to insert the photos you want to transfer like the following picture shows.


3. Using iCloud? Transfer Photos by Downloading from iCloud

If you use iCloud Photo Library, then you can transfer the photos which have been uploaded to iCloud by downloading them from iCloud.com, or from the Windows. Follow the steps as below.
Download Photos from iCloud.com

Step 1. Log in your iCloud account on iCloud.com.

Step 2. Click Photos to browse and select all the photos you want to transfer.

Step 3. Click the Download icon on the top right corner and they will be downloaded on your PC.


Download Photos by iCloud for Windows

Step 1. Download iCloud for Windows from Apple's link and run it on your PC.

Step 2. Log in your iCloud account and click Options next to Photos.

Step 3. Check iCloud Photo Library and the other options will be checked automatically, also.

Step 4. Click Done and then Apply. New photos on your iPhone you add to iCloud Photo Library will be automatically downloaded to the PC.


Sponsor ads:

Gihosoft Free iPhone Data Recovery:iphonerecovery.com

Free iPhone Data Recovery Software for Windows/Mac

Recover up to 12+ types of files, including contacts, SMS, photos, WhatsApp, Viber, notes, etc.

Restore lost data from iOS devices directly or from iTunes and iCloud backup

Recover iPhone data lost due to iOS upgrade/jailbreak, accidental deletion, device lost or broken

Support all the latest iPhone, iPad and iPod Touch

Both Free and Pro version.

If you lost data after you updated to a new iPhone, you can always use Gihosoft iPhone Data Recovery to get the data back from the old iPhone or backup.

Top 10 Best FRP Bypass Tools to Bypass Google Account on Android Device 2019

Worth reading:download youtube 1080p

If you use android phones, please choose Gihosoft Android Data Recovery

Jihosoft Android Data Recovery: the best Android Data Recovery software for Windows and Mac to recover deleted contacts, messages, photos, videos, WhatsApp and etc from Android

Tuesday, 28 August 2018

Tips on Stop Google from Tracking Your Location on Android, iOS and the Web


The Associated Press report reveals that Google may stop storing the data for locations you visit when you turn off location sharing, but several Google apps still store time-stamped location data as default behaviour, without getting user consent. So it’s clear that there’s some data being stored about the places you visit when you open these apps.

If you’re worried about this data being used to show you ads and may even be used by the government, it’s a good idea to turn off all location tracking completely. It must be noted though that you would be breaking a lot of Google services by taking this route, so you won’t be able to use many apps to their full capability. Here are the steps you must follow to stop location tracking and delete existing data:
Stop Google From Tracking You

While we assumed turning off location history was enough to stop tracking, you also need to disable the ‘Web & App Activity’ setting to deny Google access to any and all location data. Here are the steps you need to follow:You may also like:Gihosoft iPhone Data Recovery

Must Read:Gihosoft Free Android Data Recovery

Must Read:Jihosoft iTunes Backup Unlocker

Jihosoft iTunes Backup Extractor free is a powerful tool to recover and extract important data from iPhone, iPad & iPod touch backup on Windows or Mac.

You may also like:

Gihosoft Total Video Converter is a professional all-in-one video tool that enables you to convert videos and audios into various different formats.

You may also like:online youtube downloader

Disable ‘Web & App Activity’ On the Web

1. Open the browser on your desktop or mobile device and navigate to your Google Account via this link right here. Then, click on the ‘Privacy info and privacy’ option.


2. You will need to click the ‘Go to My Activity’ option to view and control all the data Google stores on you.


3. Now, go the ‘Activity Controls’ from the navigation menu on the left.


4. At the very top of the ‘Activity Controls’ settings page, you will find the blue ‘Web & App Activity’ toggle that you have to switch off.


5. When you turn this off, Google will show you a lengthy pop-up warning that you have to delete location data already collected in the past, if you haven’t already done so.


On Android

The process on Android is not all that different and the setting is buried deep in your account setting. Just follow the steps underneath:

1. Navigate to ‘Settings > Google > Google Account’ to access the settings on your Android device.


2. You then need to go to the ‘Data & personalization’ tab for the ‘Web & App Activity’ option that you need to toggle off. You will again be shown a lengthy warning, where you need to tap ‘Pause’ to disable the feature.


On iOS

Since there are no Google system apps on iOS, you won’t be able to simply jump into the device settings and stop location tracking. Each individual Google app, such as Google Search, Chrome, or Assistant, has its own settings page.

You can jump into the settings of each app and find the Google Account settings and then follow the steps described above (see the web section) to reach the ‘Web & App Activity’ option and disable the same.

in addition, you can choose when apps access your location. You can jump into the iPhone’s settings page, scroll down to select an app and change location settings for the same.


We suggest you pick the ‘While Using the App’ option to let apps only access location data when the app is open. This means it won’t be able to pinpoint and send across your location in the background but it’ll still store location data over on Google’s servers. If you want to avoid even this, pick ‘Never’ and you’ll still be able to use Maps but the app wouldn’t be able to get a location lock.

As you can essentially see, we had to dig deep into the Google Account settings to locate and disable the feature. It has been hidden away because it affects major Google services, like the Google Assistant, rendering it useless for the users.
Delete Past Location-Tagged Data

While the above steps will help you block location tracking from your web searches or through other apps, you can choose to delete the data it has already saved by following the steps underneath:

1. You first need to the ‘My Activity’ settings page using this link. This shows all your activity on Google and its linked services, including the location-tagged entries that’ll be denoted with a ‘location pin’ icon at the bottom.


2. Tapping the location pin will show a pop-up window with details for each entry, along with the location (you can see that on Google Maps) that it was recorded from.


3. You then need to tap the ‘three dots’ icon at the top right to open the overflow menu and delete the entry permanently.

Friday, 17 August 2018

How to Change Default Ringtone on Your iPhone?


Part 1: How to Change Default Ringtone on Your iPhone?

If you are tired of iPhone default ringtone, you can follow the easy step-by-step guide below to change default ringtone on your iPhone.
Step 1.Open your iPhone and click on "Settings".
Step 2.Select "Sounds & Haptics" (Sounds for some versions).
Step 3.Scroll down to "Sounds and Vibration Patterns" Section, and select "Ringtone" to enter ringtone list.
Step 4.From the list, tap your desired ringtone to select.
change-iphone-default-ringtone
You may also like:
Gihosoft Total Video Converter is a professional all-in-one video tool that enables you to convert videos and audios into various different formats. You can also download videos from YouTube or other online video sharing sites and convert them easily. Plus, you’re able to personalize your videos with its inbuilt editor, such as, trimming, cropping, applying video effects, adding watermark, subtitles, and more. If you need a powerful and professional desktop video converter program, just download Total Video Converter and follow the step-by-step guide here to have a try.

Wednesday, 2 August 2017

10 Top Essential Tricks of iOS 10 2017


10 Top Essential Tricks of iOS 10 2017


1. Flash


You can have your iPhone's LED flash light on every time a notification or call arrives. Really useful if you are silent. To activate this option, go to Settings> General> Accessibility and enable "LED flashing".


2. Airplane Mode


You can have your iPhone's LED flash light on every time a notification or call arrives. Really useful if you are silent. To activate this option, go to Settings> General> Accessibility and enable "LED flashing". Must Read:How to get iPhone out of recovery mode ?


2. Airplane Mode


Airplane Mode may be more useful than you think. If activated, your iPhone will charge your battery much faster .


3. Browsing tabs in Safari


If you place your iPhone in a horizontal position (landscape) you will see how the Safari tabs are organized in a much more efficient way. Also, in the upper left corner you will find a search field to find a particular web page .


4. Web addresses


To copy a web address simply keep your finger pressed on the address bar of Safari. Additionally, if you have previously copied a link, you can keep your finger pressed in the address bar for "Paste and Go" automatically.


5. Draw and write in photographs


Open the Photos application, choose a photo that you want to edit (signals, marks, arrows, text, drawings ...), press the edit button in the form of three parallel lines. Then tap the circular button with three dots in the upper left corner and ... Enjoy a new set of tools!


6. Intensity of flash LED


Do you have 3D Touch on your iPhone? Hallucinate by changing the intensity of the flash LED by holding your finger on the flashlight icon in the iOS 10 Control Center.


7. Open the Camera app quickly


These are two simple steps. Use the Raise to Wake function by raising the handset to turn the display on, slide your finger to the left to open the Camera . Super fast, great for photographers and instagramers!


8. Assign Ring Tones


IOS 10 allows you to assign different ringtones to each of your contacts . Open your information in the Contacts application, tap Edit, and find the ringtones option. You can even add the songs you have downloaded!


9. Relationships in Siri


You can teach Siri to learn all your relationships (family, friends, partner ...). All you have to do, for example, is ask "Remember that Sara Lopez is my partner" or "Remember that Andrés Rodríguez is my boss".


10. Siri Voice Dictation
Forgot iPhone Passcode?
Part 1. If I Reset My iPhone What Will I Lose?

After encountering a major setback in your device and the only available solution is to reset, then you need to know that you will lose some data and files (if not all). However, different reset leads to different results.

There are different kinds of reset method, these methods determine the outcome of your device and answer the question: “If I reset my iPhone, will I lose everything?”. These methods include:

A Reset Through Settings on iPhone

This is a conventional method and it is very easy. It involves only your device and tapping a few buttons in order to restore the phone. In this method, there are 2 approaches to this;


If you reset all settings, it will only be temporary and not all files or data will be lost. In fact, some junk and temp files i.e. it keeps your apps and data but will reset all personal preferences and network settings.


If you erase all content and settings, it will delete all data on your iPhone, including songs, videos, images, etc. It is somewhat similar restoring back to factory settings.

B Reset Through iCloud and iTunes

One of the available methods Apple has put in place for iPhone users to reset their phones. It involves making a connection with a PC and logging into iCloud or launching iTunes respectively. This method is however complicated but resets through iTunes and iCloud will make you lose all your files and data; more like restoring back to factory settings. If you need to get back your data you may need to get help from some professional recovery tool.
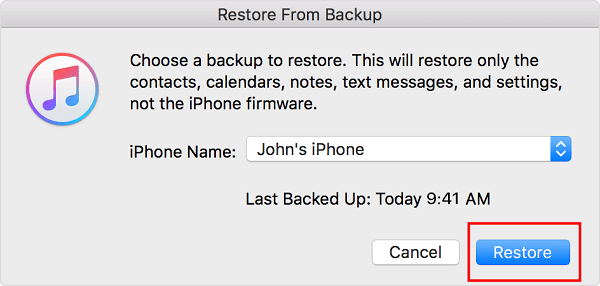
Part 2. How to Restore iPhone after Reset via iTunes

When you reset iPhone with any of the method listed above, no doubt, some important files could be deleted or lost and you would want to restore them. In order to do this, you can restore iPhone from an iTunes backup if you have backed up before. Apple set up this method so the maximal use of iTunes can be put into action and one can be able to backup devices in case of future problems.

Step 1: Connect your iPhone to a PC.

Step 2: Make a quick launch of iTunes and go to File menu, select “Devices”.

Step 3: Choose “Restore Backup”.


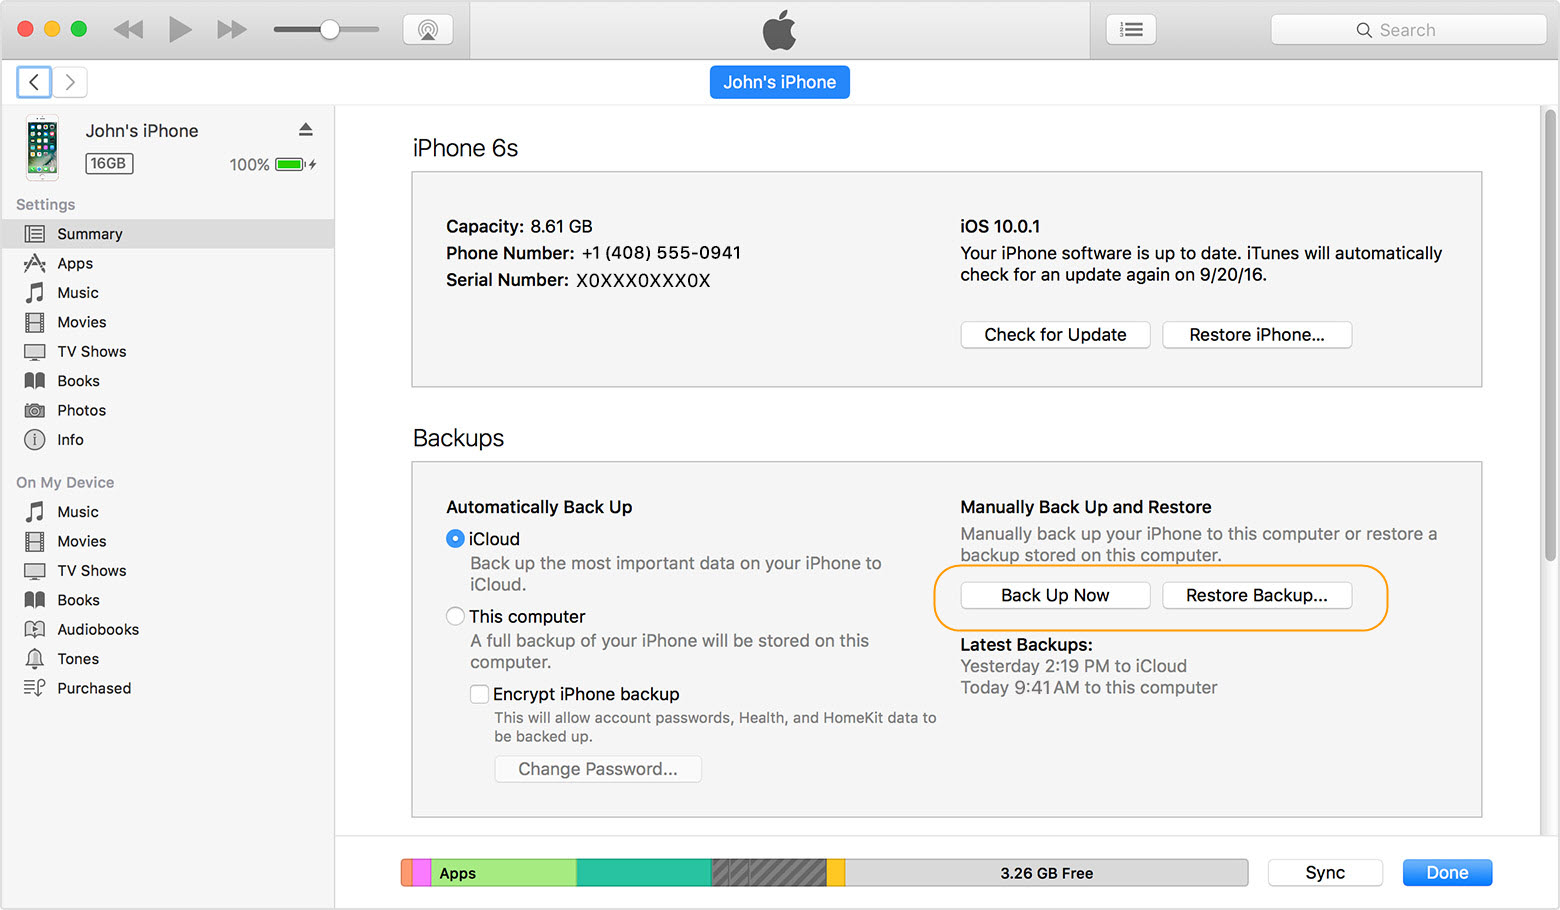
Step 4: Pick a recent backup on the basis of size and date, and click on “Restore”.


After all these steps, you now have your iPhone restored via iTunes, and this is also very useful also after reset.If you ever lost or accidentally deleted data from your iOS device, you can use the professional Gihosoft iPhone Data Recovery software to retrieve important data from iPhone, iPad or iPod Touch even without backup.

Jihosoft iPhone Backup Extractor Extract and recover all types of data from iPhone backup files, such as camera roll photos, videos, SMS, contacts, reminders, WhatsApp, and etc.

Transfer WhatsApp from Samsung to iPhone

1. Transfer WhatsApp from Samsung to iPhone via Email Chat This is a solution that you can use to read your Samsung WhatsApp data on the iPh...